
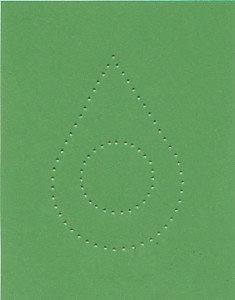
Raindrop Shaped Ornament
Pour les instructions en Français, cliquez ici.
These instructions are for the teardrop shaped pattern. If this is the first time you have tried paper embroidery, I recommend using heavy card stock as it will not tear as easily as the lighter weight card. I also recommend using a high quality embroidery floss such as DMC. The first few cards I made I used cheap floss and it frayed as I pulled it though the card, leaving the lines looking fuzzy.
You will need:
- Heavy card stock 3 3/4" x 5"
- Decorative paper - 3 3/4" x 5"
- A craft knife for cutting the aperture in the decorative paper
- Pre-folded 4 1/4" x 5 1/2" greeting card blank(or you can cut your own)
- Foam pad (1/8" or so thick)- this will get poked full of holes so be sure to use something you don't want to keep.
- Embroidery needle
- Paper piercing tool (optional)
- DMC embroidery floss: Red #304 and Gold #783
- 6 inches or so of thin gold ribbon
- Cellophane tape
- Glue
Step 1
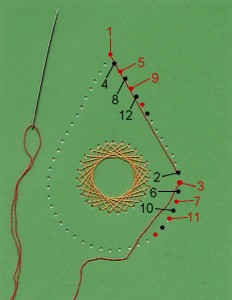
Center the pattern on the front of the heavy cardstock and tape it down using low-tack tape. Place the cardstock on top of the foam pad. Using a paper piercing tool or your embroidery needle, poke a hole through each of the dots in the pattern making sure to go all the way through the card. When you have punched all of the holes, gently remove the pattern.
Step 2
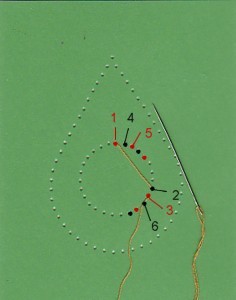
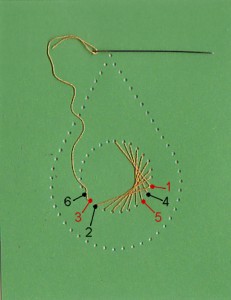
Start with the circle in the center. Use a single strand of gold embroidery floss. Tape the end of the floss to the back of the card. It's best not to tie knots as they will prevent your finished work from laying flat. Refer to the picture to the left. Red represents needle going from the back of the card to the front (or up). Black represents the needle going from the front of the card to the back (or down) Bring the needle up at 1, skip forward 8 holes and bring the needle down at 2, then up at 3, down at 4, up at 5, etc.
Step 3
Continue around the circle advancing one hole clockwise with each stitch. As you work your way around your stitches will begin to overlap. Make sure that you do not skip any stitches. When you are done, each hole should have two stitches.
Step 4
Continue the rest of the way around the circle until each hole has two stitches. Tape the end of the floss to the back of the card.
Step 5
Start at the top of the teardrop using one strand of red floss. Refer to the picture to the right. Bring the needle up at 1, count forward 14 holes and bring the needle down at 2, up at 3, down at 4, etc.
Step 6
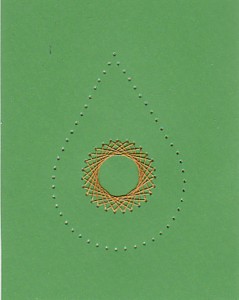
Continue clockwise around the teardrop. Your stitches will overlap as before. Make sure that you do not skip any stitches.
Step 7
When you are done, tape the end of the floss to the back of the card.
Step 8
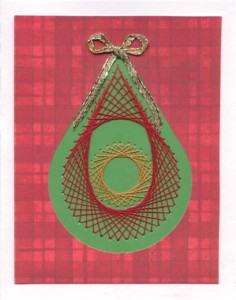
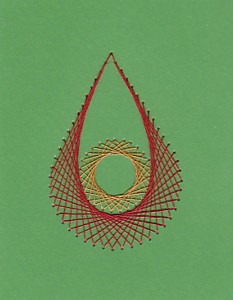
Mount your finished work on the front of the card blank, using the decorative paper as a frame. Add a gold bow to the top.
All content © 2003 - 2022 Judy Headrick and handcraftedgreetings.com unless otherwise noted
Handcrafted Greetings Logo Designed by Tony Headrick
Handcrafted Greetings Logo Designed by Tony Headrick