
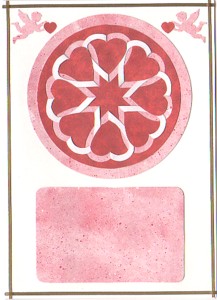
Cut and Fold Valentine
Make this pretty cut and fold Valentine for your sweetheart. You can download the pattern here.
For best results read all the way through the instructions before starting.
You will need:
- Valentine Cut and Fold Pattern
- 5" x 7" white card blank
- Approximately 4" x 6" Red paper - the back of the paper should be white
- Approximately 5" x 7" speckled red and white or pink paper
- Approximately 1 1/2" x 3" White paper
- 1/16" gold border sticker
- Red glitter gel pen
- Medium cupid punch (Family Treasures 1 1/8" punch)
- Small cupid punch (Carl 3/4" punch)
- Small heart punch (McGill 3/8" punch)
- Circle cutter (Coluzzle small nested circle template)
- Paper cutter or rectangle cutting template (Coluzzle nested rectangle template)
- Round-barreled craft knife. (I use a Lac� knife. It looks kind of like a pencil with a blade on the end. The shape makes it easier to turn corners than the flat craft knives)
- Cutting mat
- Glue
- Low-tack tape or plastic-tack
- Tweezers (optional - used for arranging small punched out items on the card)

Step 1
Cut/punch the following from the speckled/pink paper:
- Cut a 3 7/8" Circle (#2 circle on the Coluzzle small nested circle template)
- Cut a 3 1/2" x 2 1/4" rectangle (#5 on the Coluzzle nested rectangle template)
- Punch 2 medium cupids
- Punch 1 small cupid
- Punch 8 small hearts
Step 2
Cut/Punch the following from the red paper, leaving a 3 1/2" square for later:
- Cut a 1 3/4" x 3" rectangle (#6 on the Coluzzle nested rectangle template)
- Punch 6 small hearts
Step 3
Cut/Punch the following from the white paper:
- Cut a 1 1/4" x 2 1/2" rectangle (#7 on the Coluzzle nested rectangle template)
- Punch 4 small hearts.
Step 4
Using low-tack tape or plastic-tack attach the Valentine Cut and Fold Pattern to the 3 1/4" square of red paper. You will be cutting a circle around the finished design, so make sure you place the pattern at least 1/4" from the edges of the paper.
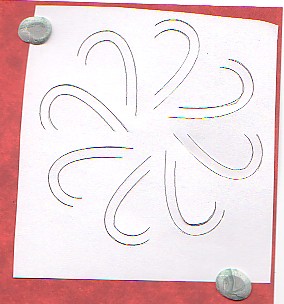
Step 5
Place the paper with the pattern attached to it on a cutting mat. Using your craft knife, carefully cut along each of the lines making sure that you cut through both the pattern and the paper underneath.
Step 6
Remove the pattern. Fold back each of the half-heart cut outs as shown.

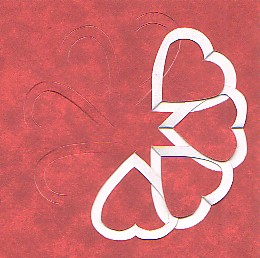
Step 7
Tuck the edge of each cut-out under the solid center of the next cut-out as shown.
Step 8
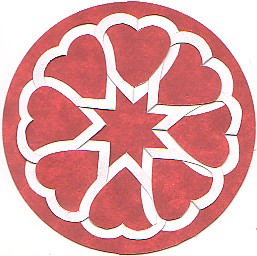
After you have finished folding and tucking, use a circle-cutter to cut a 3 3/8" circle around the design. (#3 circle on the Coluzzle template)
Step 9
Center and glue the design to the speckled/pink circle you cut out in Step 1.
Step 10
Attach the gold border to the card blank.
Step 11
Arrange the cupids, two red hearts, the design and the speckled rectangle on the front of the card as shown to determine spacing. Once you are satisfied with the placement, glue them to the card.
Step 12
Step 12
Finish as follows:
- Write or stamp "Be Mine" (or some other sentiment)on the white rectangle.
- Center and glue the red rectangle to the speckled rectangle
- Center and glue the white rectangle to the red rectangle
- Glue red hearts to corners of white rectangle
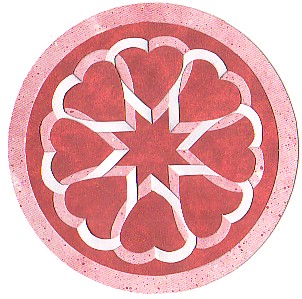
- Glue white hearts to corners of speckled rectangle
- Glue the 8 speckled/pink hearts to the center of each solid heart on the design. Refer to picture for placement.
- Glue small cupid to center of design
Handcrafted Greetings Logo Designed by Tony Headrick