
Sparkly Butterfly Thank You Card
Description
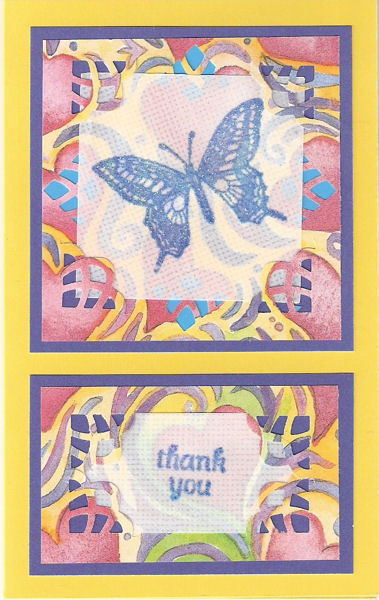
A bright butterfly brings a message of gratitude.
Instructions:
- From dark blue cardstock, cut a 3 1/4" square and a 3 1/4" x 2" rectangle.
- From the turquoise cardstock, cut a 2 1/8" square
- From patterned paper, cut a 3" square and a 3" x 1 3/4" rectangle
- From vellum, cut a 2 2/4" square and a 2 1/4" x 1 1/4" rectangle
- Stamp and emboss butterfly on vellum square Stamp and emboss Thank You on vellum rectangle
- Punch corners of 3" patterned square and rectangle. The punch outs will overlap a little on the rectangle.
- Remove corner guide from punch and punch the center of each side. You will have to hold the punch at an angle so that the corner of the punch-out is pointing at the center of side of the square.
- Glue the light blue cardstock to the back of the patterned square at a 45 degree angle so that the light blue shows through the side punches.
- Center the vellum square on the patterned paper, tucking the corners under the punch outs. There will be about a 1/8" gap between the edge of the vellum and the outer edge of the corner punch outs.
- Glue the patterned paper to the center of the dark blue card stock.
- Insert the vellum rectangle in the corner punch outs on the patterned rectangle so that you can see where it needs to be trimmed so that the dark blue cardstock shows through.
- Mark vellum with a pencil, then remove it to trim it.
- After trimming the vellum, glue it into place
- Glue patterned rectangle to dark blue rectangle
- Mount the square and rectangle to the front of the card as shown
Supplies
- Glue stick
- Yellow card blank 3.75" x 6"
- Dark blue card stock
- Turquois card stock
- Patterned scrapbook paper
- White vellum
- Butterfly stamp (Stampin Up! Touch of Nature)
- Thank You stamp (Inkadinkadoo Just Saying #97635)
- Blue pigment ink
- Holographic embossing powder (Ranger)
- Fiskars Paper Trimmer
- Journey Heat Gun (TO-0083)