
Mola Christmas Ornament
Description
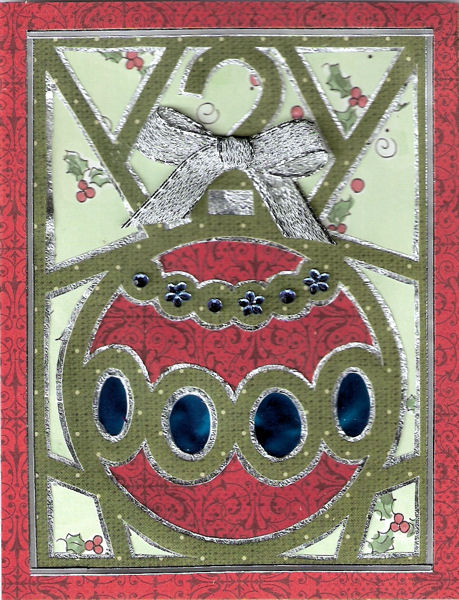
Mola can be cut in many different ways. This is a very basic pattern with simple cuts. As you become more proficient, in this method, you can become more creative with the layers.
To make this card, start with the top layer. Each layer is added under the previous layer one at a time, cutting each layer as you go. Here is how I cut this card.
- Layer 1 (green) cut out all white spaces.
- Add layer 2 (silver) cut out the spaces inside the ornament, except the centers of the ovals, cutting 1/16 inch from the green layer.
- Add layer 3 (red) cut out all spaces around the ornament, except the rectangle at the top of the ornament, cutting about 1/16 inch from the green layer.
- Layer 4 (green with holly) cut out only the centers of the ovals across the middle of the ornament.
- Layer 5 (blue foil) you don't need to cut anything
- Frame: Cut 4.25 inch x 5.5 inch frame with a 1/4 inch border from the red paper and mount it on top of the green layer.
- Add silver border peel-offs along the inside edges of the frame.
- Add jewels and bow to the ornament
- Mount onto a card blank
Links
Supplies
- Glue stick
- Card blank 4.25" x 5.5"
- Flower shaped jewels (Queen & Co.)
- Round jewels (Queen & Co.)
- Blue foil gift wrap
- Silver foil
- Christmas theme scrapbook paper
- Silver 3/8" ribbon
- Silver border stickers
- Journey Cutting Mat (TO-0148)
- Retractable Craft Knife (TO-0145)